Frequently asked questions
Installation
Install iLok software this is required for the activation
First please make sure you have installed the latest ilok software from:
www.ilok.com
When you do not have an ilok.com account, please create one for free at ilok.com.
Get the Altiverb license
If you do not have the Altiverb license on your ilok account yet, you can request it here:
www.audioease.com/authorization
Then open the ilok license manager application, sign in to your ilok.com account and choose to activate the Altiverb license. You can activate the license to your computer (machine activation) or to your iLok (2nd generation or up) USB key.
Request an Altiverb downloads email
To get the latest Altiverb installer, please request an access link to your current downloads page at:
www.audioease.com/download
Complete install
Check your email, open the downloads page from the link in the email and then proceed to download the latest Complete Altiverb installer (that is the large 4-8 GB download, NOT the plug-in updater).
Extract the zip file with the OS default tool ( macOS: Archive Utility, Windows: choose Extract All...) and then open the Altiverb installer to install Altiverb.
The installer will install the impulse responses and the plug-ins.
Then open your DAW and you will find Altiverb is available as effect ready to add reverb to your audio.
To update an installed Altiverb 8 to the latest version simply request a link to the downloads page and download the latest plug-in updater. The update installer will take care of updating, no need to uninstall or anything.
www.audioease.com/download
Update old 8 install to the latest 8
When you are updating a really old Altiverb 8 installation (more then two years) to the latest you can best download the latest complete Altiverb 8 installer (not the updater) to make sure the Core IR Library (the impulse responses) get updated to the latest version to0. The Altiverb 8 impulse responses core library gets updated every few years and if you update from an old Altiverb 8 it is required to re-install the latest complete IR set.
New impulse responses (IRs)
We are continuously looking for, traveling to and recording the nicest acoustics from all around the world. We add new IRs to the Altiverb collection regularly and to install these simply open the IR Browser in Altiverb 8, hit the NEWS button and Altiverb will show you what IRs are available for download. And a single click on the download button is enough to add the IR to your collection.
Upgrade old Altiverb to version 8
You can upgrade any old Altiverb version (version 1, 2, 3, 4, 5, 6 or 7) to version 8. Check your options at:
www.audioease.com/store/#upgrade
Windows
Simply uninstall Altiverb 8 via the add/remove software Control Panel.
macOS
To uninstall Altiverb 8 on macOS please delete the Altiverb 8 plug-ins from here:
| AAX: | /Library/Application Support/Avid/Audio/Plug-Ins/ |
| AU: | /Library/Audio/Plug-Ins/Components/ |
| VST3: | /Library/Audio/Plug-Ins/VST3/ |
/Users/Shared/Audio Ease/Altiverb 8/Impulse Responses/Audio Ease IRs
/Users/Shared/Audio Ease/Preferences/Altiverb 8.aeprefs
/Users/Shared/Audio Ease/Preferences/AV8_Favorites.db
And the Altiverb 8 cache:
/Users/name/Library/Caches/Altiverb 8 *
* Please note macOS X hides the Library folder in your user folder. You can go there by hitting the GO menu item in the menu bar when you have a finder window open. Then hold down the option (alt) key and a link to the User Library will appear.
- Make sure you use the macOS default 'Archive Utility' to open the downloaded zip file (other utilities could corrupt the installer app while unpacking the zip file).
- In case that does not solve it, open Terminal. You can use the Mac search at the top right and start typing Terminal. It will appear, click on it to open the program.
- Type “unzip” and a space, then drag/drop the zip file into the Terminal window.
- Press Enter and the zip file will be unzipped, storing all files on your computer.
/Library/ScreenSavers/Download Altiverb screensaver
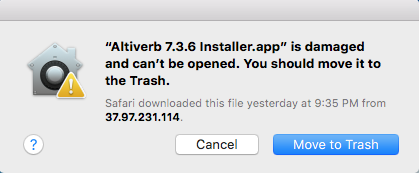
Here's what you can do when the newly downloaded installer fails to run because the macOS reports the downloaded installer failing verification (or reports it is damaged and cannot be opened).
- Make sure you use the macOS default 'Archive Utility' to open the downloaded zip file (other utilities could corrupt the installer app while unpacking the zip file).
- Please check if there is a security update available for your macOS and please install this.
- Open Safari and check if you can visit https://www.audioease.com.
When you can visit the website in Safari, then please retry downloading the installer. If the download fails to run, you can try using a different browser. Any of the following: Firefox, Opera, Chrome, Safari, will do.
Install iLok software
First please make sure you have installed the latest ilok software from:
www.ilok.com
Get the Speakerphone license
If you do not have the Speakerphone license on your ilok account yet, you can request it here:
www.audioease.com/authorization
Then open the ilok license manager application, sign in to your ilok.com account and choose to activate the Speakerphone license to your computer (machine activation) or to your iLok USB key (2nd generation or up).
Request a downloads email
To get the latest Speakerphone installer, please request access to your current downloads page at:
www.audioease.com/download
Complete installer
Check your email, open the downloads page from the link in the email and then proceed to download the latest Complete Speakerphone installer (a large 4.5 GB download, NOT the plug-in updater).
Extract the zip file with the OS default tool ( macOS: Archive Utility, Windows: choose Extract All...) and then open the Speakerphone installer to install Speakerphone and all the samples.
Then open your DAW and you will find Speakerphone is available as effect ready to worldize (futz!) your audio.
To update an installed Speakerphone to the latest version simply request access to the downloads page and download the latest plug-in updater. The update installer will take care of updating, no need to uninstall or anything. www.audioease.com/download
Windows
Simply uninstall Speakerphone via the add/remove software Control Panel.
macOS
To uninstall Speakerphone on macOS please delete the Speakerphone plug-ins from here:
| AAX: | /Library/Application Support/Avid/Audio/Plug-Ins/ |
| AU: | /Library/Audio/Plug-Ins/Components/ |
| VST: | /Library/Audio/Plug-Ins/VST/ |
/Users/Shared/Audio Ease/Speakerphone/Samples
And the Speakerphone preferences file:
/Users/Shared/Audio Ease/Preferences/Speakerphone.aeprefs
License activation
www.audioease.com/ed
Why register?
When registered you can access the downloads and immediately get licenses to activate the software.
When you have purchased your software directly at audioease.com there is no serial number. In this situation you can get your licenses directly at:
www.audioease.com/authorization
Simply go here: www.audioease.com/authorization
fill in your registered email address and proceed.
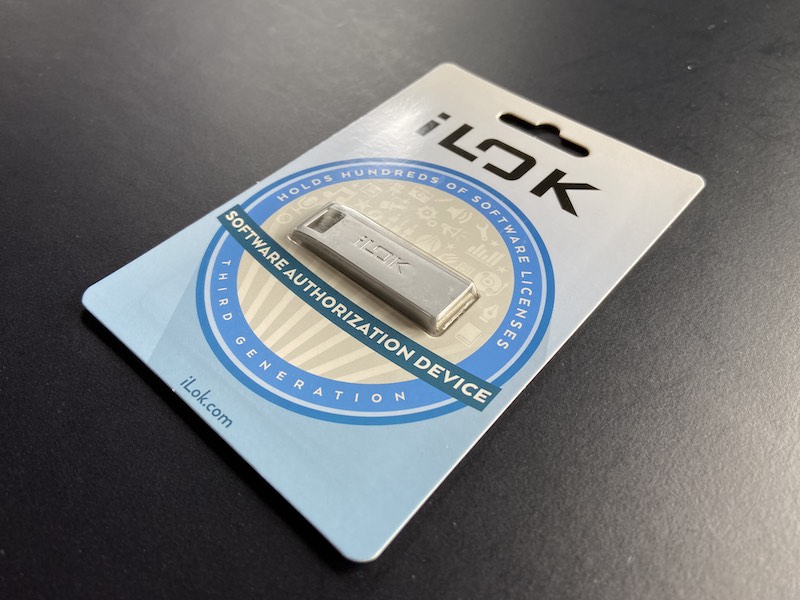
Send a message to support@audioease.com and we will provide you with a 30 days expiring backup license so you can continue your work immediately. A spare iLok USB key is required for this, as the software (Altiverb, Speakerphone and Indoor) requires the ilok usb key. This means the software will not work without an ilok usb key with a license on it.
To resolve this situation permanently you may have to acquire another iLok USB key. We can help here too:
We can send you one at a not-for-our-profit-price, which will normally takes 2-6 weekdays in Europe (6-20 weekdays to the rest of the world), available at: audioease.com/store. Depending on your location purchasing locally might be quicker.
You can transfer a license from your ilok account to someone else's ilok account (the new owner) by using the iLok License Manager (choose Transfer License...).
Please note: while PACE/ iLok fees apply, there are no fees imposed by Audio Ease.
Do please send a message to support@audioease.com with the name, email address and ilok user account info of both you and the new owner.
We will then transfer the software registration at audioease.com to the new owner, so that they will be able to access all downloads and (future) upgrades.
However you can use the software only at one computer at a time.
When you need to run the software in two locations (two rooms / two machines) at the same time this requires two licenses. This means purchasing two copies of the software. We do not offer any second license deals or discounts.
General troubleshooting
360pan suite 3 works fine using Rosetta 2 on the Apple silicon machines. The performance is great.
The latest BarbaBatch, Snapper and Make a Test Tone are all universal applications, supporting both Apple silicon & Intel.
Last update: Dec 6, 2024
Send a message to support@audioease.com and we will provide you with a 30 days expiring backup license so you can continue your work immediately when you have a spare ilok key.
To resolve this situation permanently you may have to acquire another iLok key. We can help here too:
We can send you one at a not-for-our-profit-price, which will normally takes 2 to 5 shipping days in Europe (6-20 days to the rest of the world), available at: audioease.com/store. Depending on your location purchasing locally might be quicker.
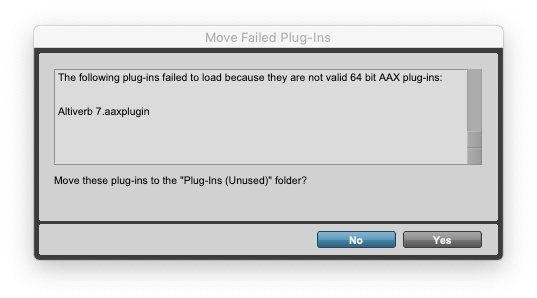
Most likely the installer or the plug-in got corrupted in transit. Please download the latest updater installer on the computer you want to use it on. Then move the downloaded zip file on the desktop and there choose to extract it using the Mac OS X default Archive Utility app. Once you did this please run the updater installer from the desktop to install the correct aaxplugin and this should cure the problem.
The aax plug-in can get corrupted when transferred on some external (or network) drives. The plug-in won't validate properly then.
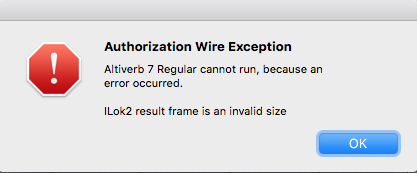 "Speakerphone / Altiverb cannot run, because an error occurred. Encrypted Channel Bad Channel ID (or USB error or frame is an invalid size)"
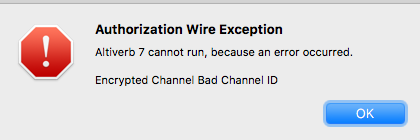
Errors like these can be solved by downloading and installing the latest ilok software from www.ilok.com. Altiverb, Speakerphone, Indoor and 360pan suite require this software.
This error means the graphics card driver on your system is not up to date. Even when Windows states this is up to date, Altiverb 7 can generate this error and you will find there is a newer driver available (and this will solve this error).
Please try to update your graphics card driver.
Find out what graphics card you have in your system (right click on your desktop, choose change screen resolution, hit advanced settings, that would show you the manufacturer"s name and the model).
Then please go to the manufacturer"s website, hit support/drivers and find the latest driver for your graphics card and download and install this.
Restart your computer.
The problem should be gone now.
Let's clear Clear the Cubase vst preferences to force a re-scan of all vst plug-ins (in case the plug-in is blacklisted)
- Remove all plist/xml files with VST in the file name from the Cubase preferences folder, check this post where to find the preferences folder.
- Then restart your computer.
- After the restart run Cubase. Cubase will now re-scan all plug-ins and it should load the plug-in again.
360pan suite
When the Hybrid Engine is disabled the distance cannot be controlled for a panned source. The 360reverb does work as normal reverb insert/aux effect on HDX systems with disabled Hybrid Engine.
In Reaper choose Preferences... from the bottom of the Options menu and then first go to:
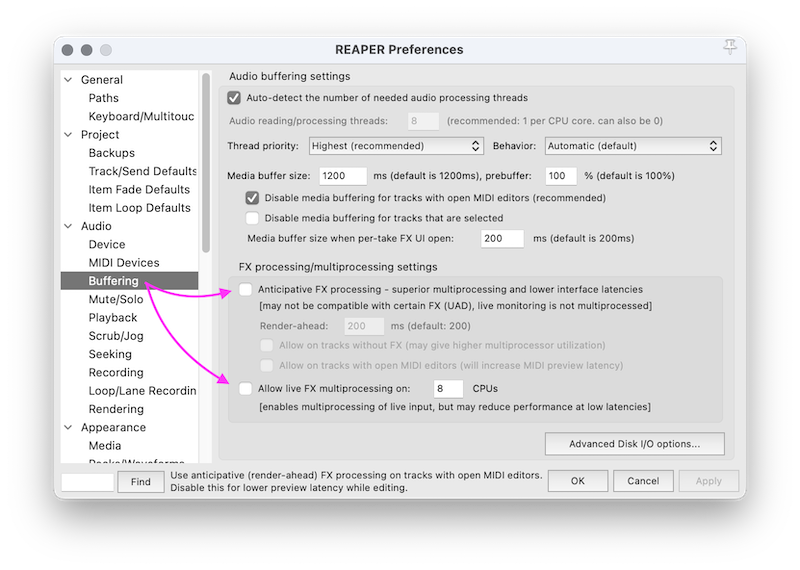 1. Audio -> Buffering
and then TURN OFF the Anticipative FX Processing
2. Audio -> Buffering
and then TURN OFF the Live FX multiprocessing
these two options will ensure the 360reverb to function properly (else you will get sync problems)
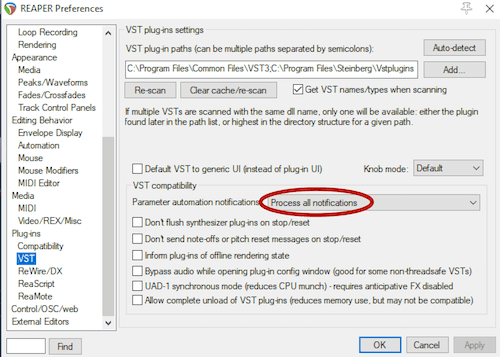
3. Plug-Ins -> VST
Under VST Compatibility please set the Parameter automation notification to:
Process all notifications
this will ensure automation is written to track when you control the panner pucks from the video overlay (without the panner plug-ins being open).
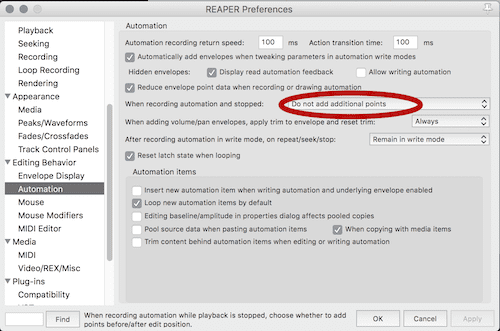
4. Editing Behavior -> Automation
When recording automation and stopped should be set to: Do not add additional points.
This to ensure you can nudge the time cursor and then drag pucks and write automation this way (like in the tutorial/example project).
5. Reverb last
When creating a bus for 360Reverb, make sure it is last, or right before the monitor.
6. Your Video window can not be Docked, and the video window can not be full screen.
These are not in the settings window. You right-click on your video to undock it if it is embedded in another window.
Solution:In Reaper choose Preferences... from the bottom of the Options menu and then open the VST tab in Plug-Ins:
- Hit the Re-scan... button
- Choose (from the popup menu) Clear cache and re-scan VST paths for all plug-ins
- Quit and restart the Reaper app
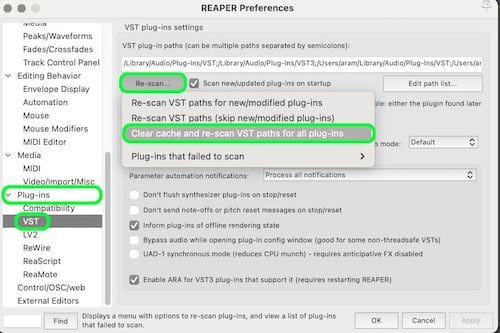
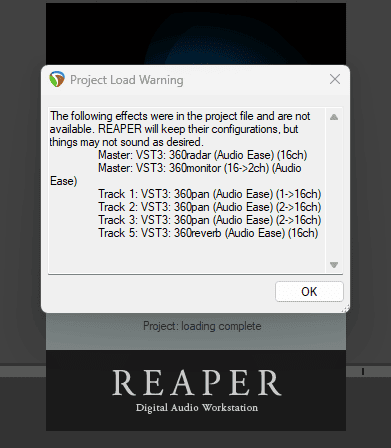
Clearing the cache should solve warnings like this:
Open the practice project START and open the workflow video and practice along with the video.
Available for Pro Tools, Reaper and Nuendo at:
www.audioease.com/360/#example
www.audioease.com/360/#goodies
Ambisonics audio is a 3D audio sphere and headlocked (fixed) stereo sound does not fit into this.
This is simply impossible.
Headlocked mono is possible, that is the top channel only.
360pan suite offer to mix to the top channel using the position blur control.
More position blur (more mix to top) is more mono, more inhead/headlocked.
When you pan your stereo source hard left and right (-90 and +90) in the ambisonics sphere and you set the position blur to half way (somewhere between 0.40-0.60) you will find there is stereo sensation while you cannot really identify things turning when you look around in the 3D sphere.
If you move the position blur control more towards 1 you will find it will rotate less, but it will also be more mono. That is the trade off.
Altiverb 8
You have to copy these to the new location Altiverb 8 uses to ensure Altiverb 8 also finds these.
The new location is:
macos:
/Users/Shared/Audio Ease/Altiverb/Impulse Responses/User Created IRs
Windows:
C:\Program Files\Audio Ease\Altiverb 8\Impulse Responses\User Created IRs
Your custom (User Created) IRs could have been in these locations for Altiverb 7:
macos:
/Applications/Audio Ease/Altiverb 7/Impulse Responses/Third Party IR Libraries
/Users/Shared/Altiverb/Third Party IR Libraries
/Applications/Audio Ease/Altiverb 7/Impulse Responses/User Created IRs
/Users/yourusername/Library/Application Support/Altiverb/User Created IRs
Windows:
C:\Program Files\Audio Ease\Altiverb 7\Impulse Responses\Third Party IR Libraries
C:\Program Files\Audio Ease\Altiverb 7\Impulse Responses\User Created IRs
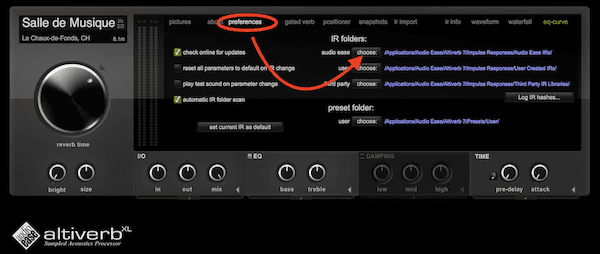
You can also verify Altiverb 8 uses this location, in the preferences tab in the plug-in:
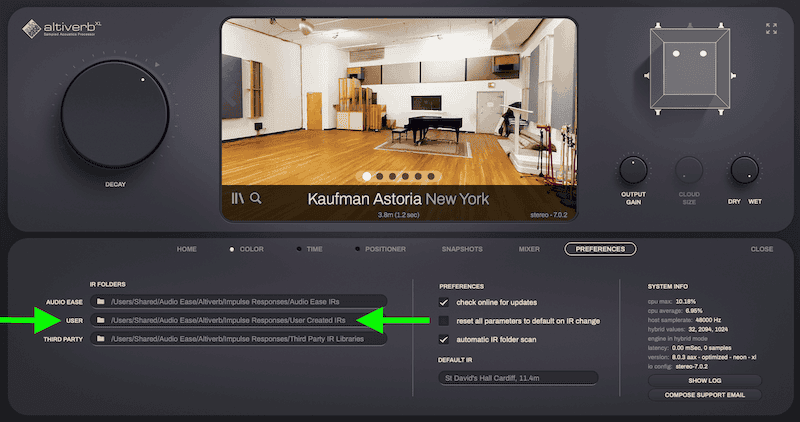
And when you just moved the files, hit the folder icon and choose rescan to ensure all IRs get added. Then quit and start your DAW and retry opening the project using the custom IRs.
The Altiverb 8 upgrade license replaces your Altiverb 7 license, and the Altiverb 8 plug-in will replace Altiverb 7 in your older sessions, sounding identical to Altiverb 7 (and Altiverb 6 and Altiverb 5).
more on 5.x instances from v7 to v8
Forward compatibility is limited: sessions made with Altiverb 8 don’t load reliably on systems with altiverb 7 installed because new functions may have been used in the Altiverb 8 session that are lacking in Altiverb 7.
Ableton Live
Digital Performer
Pyramix
Reaper 7.33 or lower
(we recommend the latest Reaper, the replacement works fine then)
Sequoia
Transfer settings from v7 to v8
First re-install Altiverb 7, the Altiverb 8 installer has removed the Altiverb 7 plug-in. You can of course download this if you do not have the installer anymore. Then follow these steps:
1. Open your project made with Altiverb 7 and save presets for all Altiverb 7 instances.
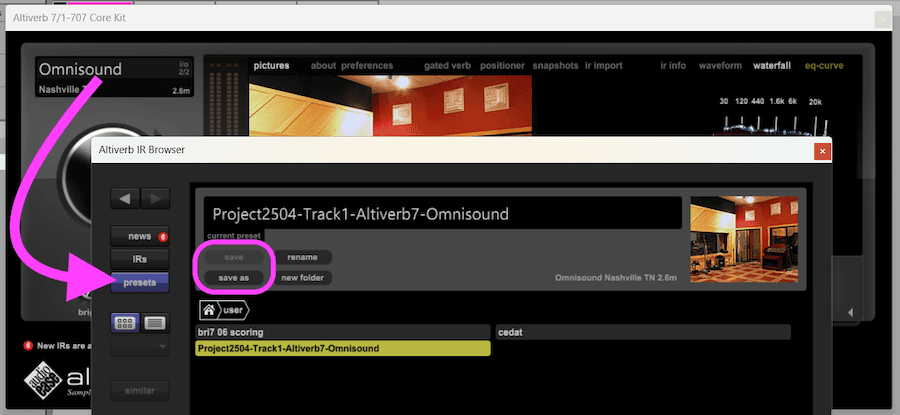
2. The presets are saved here:
macos: /Users/yourusername/Library/Application Support/Altiverb/User Presets
Windows: C:\Program Files\Audio Ease\Altiverb 7\Presets\User

3. Insert Altiverb 8 on the same channel as the Altiverb 7 and then in the snapshot tab in the Altiverb 8 plug-in you can import the Altiverb 7 preset.
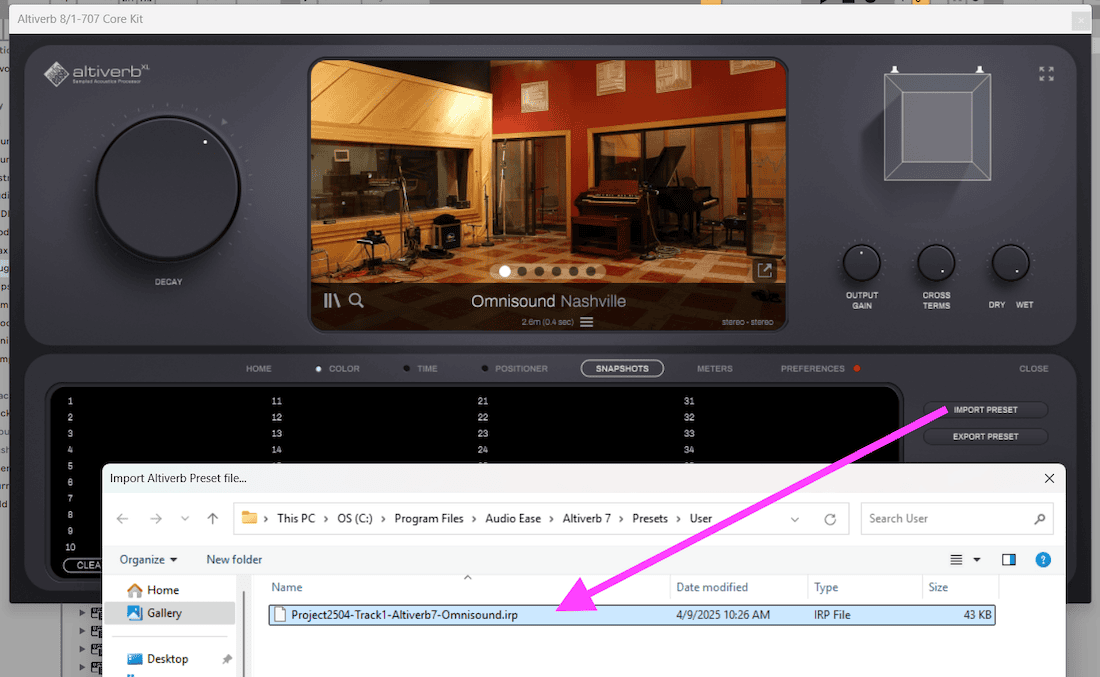
4. Now you can remove the Altiverb 7 plug-in and save your project.
This way you moved from the old to the new version while keeping the same settings.
While Altiverb 8 is backwards compatible with Altiverb 7 there are some big changes in the multichannel Altiverb 8 implementation that changes the output of the 5.x channel plug-in specifically.
There are three types of '5.x' Altiverb instances in use:
Type 1: the fivefold multi-mono type. Altiverb 8 sounds identical to Altiverb 7 in this one.
Type 2: Mono or stereo input to 5.x out: this instance is 3dB louder than Altiverb 7, and otherwise identical. We can no longer fix this without breaking more sessions than it fixes. A -3dB Trim after your Altiverb 8 will fix this.
Type 3: The 5.x in 5.x out version of Altiverb 8 does not sound the same as Altiverb 7.
It sounds similar at cloud-size maximum (loading the old quad IR with center beed and all), but the level does not match. A fundamental internal routing change that allows for the new cloud-size feature breaks this backward compatibility.
Only Type 3 is trouble when migrating from v7 to v8.
If you need to pick up an Altiverb 7 session with (type 3) 5.0 to 5.0 output reverbs then use Altiverb 7 to be safe (if on silicon, with pro tools in rosetta mode). A v7 license will be supplied if you ask for it. If you want to move forward and use Altiverb 8 anyway, check the level of the reverb and adjust it.
While you are at it, it is best to change the chosen IR to one that is true 5.0, rather than load the old Altiverb 7 quad-with-center-bleed type.
The full note from the 8.0.7 update
note 1:
Levels are improved in Backward compatibility situations for the Altiverb 7 instances with input-output: quad to quad, 5.0 to 5.0 and 5.1 to 5.1.
Altiverb is a music and post reverb. The 5.0-in 5.0-out Altiverb, however is mainly targeting post. The 5.0-in 5.0-out Altiverb 8 loads new true 5.0 IRs by default, implements easy center-channel-only reverb with input pan following and adjustable cloud size. For Post this instance has undergone massive improvements and it was the most challenging to keep it backward compatible.
In a 5.0 input to 5.0 output instance of Altiverb 7 a stereo to quad output IR was loaded by default, mainly because no 5.0 IRs existed in Altiverb 7. Center reverb was created via the center bleed option, a delayed mix of the rear channels in the front. Altiverb 8 will load the IR that was chosen in Altiverb 7, including the center bleed. You may, as we do, prefer the native Altiverb 8 way: if you have just upgraded to v8 when opening your Altiverb 7 project or template we advise you to open your Altiverb 5.0 input to 5.0 output instances and load the true 5.0 Impulse Response in there. One should be available for most Impulse Responses in the Altiverb collection.
When cloud size is increased it gradually adds speakers which increases the total level. Cloud size did not exist in Altiverb 7. In Altiverb 8 5.0 input to 5.0 output Altiverb 7 settings are loaded with 60% cloud size, which may result in a higher output level than in Altiverb 7 produced, depending on different circumstances.
Similar measures have been taken in the quad input quad output and the 5.1 input 5.1 output instances. Please note that all of the above only applies to Altiverb 7 settings received by Altiverb 8.
Or opening sessions made with Altiverb XL results in inactive plug-ins.
This could be due to incorrect plug-in cache in Pro Tools.
Solution: Force a re-scan of the plug-in.
First make sure Pro Tools is Quit. Then please remove these files: /Users/Shared/Pro Tools/AAXPlugInCache/Altiverb 7.aaxplugin.plugincache
/Users/Shared/Pro Tools/AAXPlugInCache/Altiverb 8.aaxplugin.plugincache
Now open Pro Tools. Pro Tools should re-scan the Altiverb plug-in and it should discover the XL multi-channel surround options now.
First do a complete install (if you did not do this already) to ensure you have the IRs installed. The IRs for Altiverb 8 will get installed by default in:
/Users/Shared/Audio Ease/Altiverb/Impulse Responses/Audio Ease IRs
Once installed, open this location in the finder and move the Impulse Responses folder to your external drive, anyhwere you like.
Now, open the Altiverb 8 plug-in in your DAW, go to the preferences tab in the Altiverb 8 plug-in and reconnect all three IR folders to the new locations, by clicking on the folder icon for each and choosing 'select other location' like this:

Once you set this, quit your DAW and open it again. From now on the new location on your external drive will be used.
Before you upgrade to Altiverb 8 please save the settings of your MAS Altiverb 7 plug-in instances in your projects as Altiverb presets (irp files). You can do this in the Altiverb IR browser.
These will be converted by the Altiverb 8 installer but you can also choose to import Altiverb 7 presets in the Altiverb 8 plugin, in the snapshot panel. In case in a while you need to turn back to an old project where you have not done that we can provide temporary licenses so you can do this still.
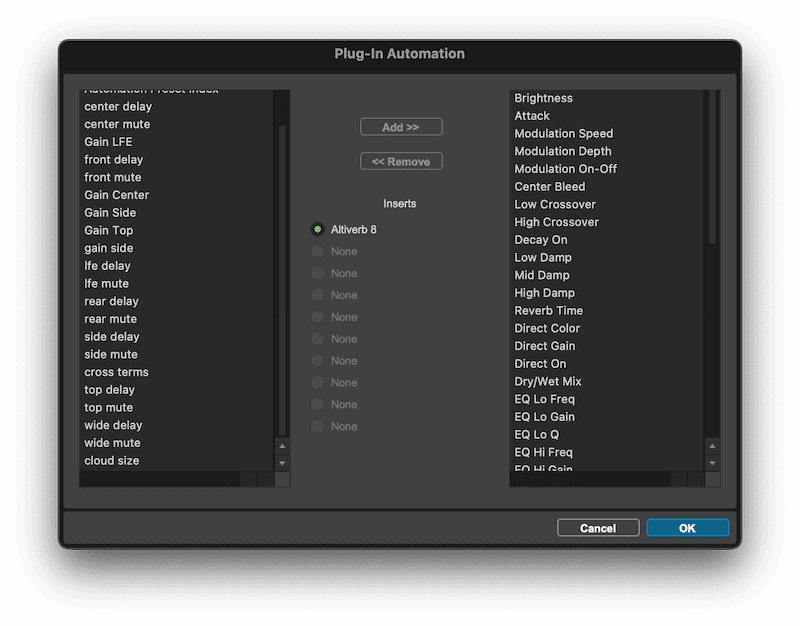
Of course when you insert a new Altiverb 8 instance all parameters do get enabled directly (if you have this enabled in the pro tools preferences).
Speakerphone
Hit the little triangle icon in the top right corner of the Samplebay module in Speakerphone.
Then from the menu that pops up you can open the current Samples folder. Then move this to an external drive and then in the Speakerphone plug-in open the same menu again and use the CHANGE SAMPLES FOLDER option to point Speakerphone to the new location.
Then quit and open your DAW and from then on Speakerphone should use the samples from the external drive.

Before you upgrade to Speakerphone 3 please save the settings of your MAS Speakerphone 2 plug-in instances in your projects as Speakerphone presets (spp files). You can do this in the Speakerphone preset browser.
These will be converted by the Speakerphone 3 installer so you can load your settings into your Speakerphone 3 Audio Unit instances when you replace them. In case in a while you need to turn back to an old project where you have not done that we can provide temporary licenses so you can do this still.
Speakerphone 2 requires Open Using Rosetta on the Apple silicon (M1/M2/M3/etc) macs. Speakerphone 3 adds native support for apple silicon. You can check your upgrade options here.
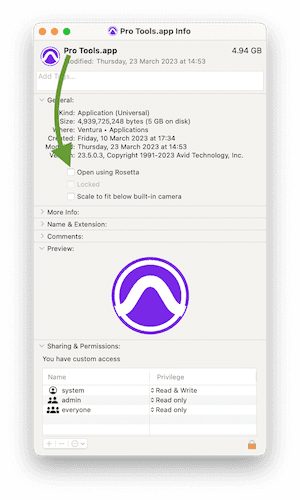
You need to open Pro Tools using Rosetta in order to use Speakerphone 2.
To ensure Pro Tools opens using Rosetta:
- open the Finder
- go to the Applications folder
- select the Pro Tools app
- hit get info
- tick the box to Open Using Rosetta.
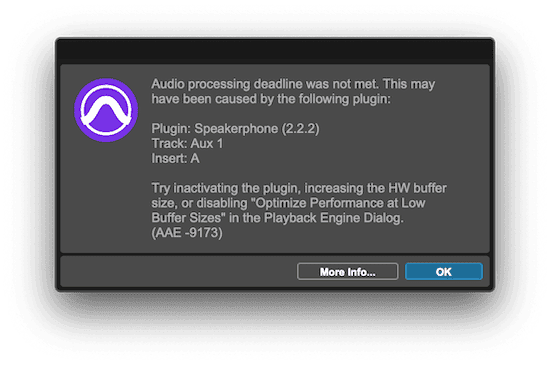
This problem only occurs on Intel macs with Pro Tools 2024.3.1 & 2024.6 and Speakerphone v2 (not v3!).
You can workaround this problem by Updating Pro Tools to 2024.10 or up.
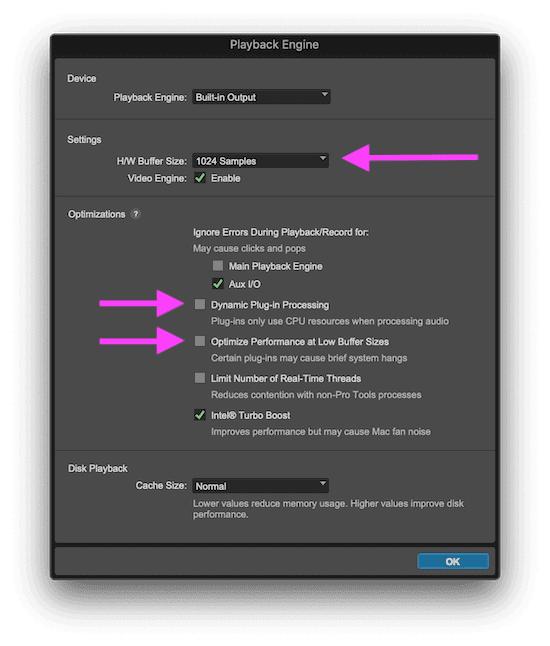
If updating Pro Tools is no option, then you can try these workarounds:
- Increasing the H/W Buffer Size in the Pro Tools Playback Enging settings
- Disabling Dynamic Plug-in Processing in the Pro Tools Playback Engine settings
- Disabling Optimize Performance at Low Buffer Sizes in the Pro Tools Playback Engine settings
- Or reverting to an earlier Pro Tools (in Pro Tools 2024.3 this error does not occur).
You are free to use this one instead of the latest, the 2.0.5 installer is available from the downloads page.
We strongly discourage running this old Speakerphone 2. This version will not be updated anymore. We recommend to use the latest Speakerphone 2.1. This one does require the iLok (2nd generation or up) key yes. Whenever your ilok key breaks or you loose it, we will always help you (supply a new license for a replacement key).
Solution:
We need to fix this in the installer of course, but when you delete the Speakerphone.dpm (the RTAS plug-in) from: /Library/Application Support/Digidesign/Plug-Ins/ this error message will be gone.
Altiverb 7
Altiverb 7 requires Open Using Rosetta on the Apple silicon (M1/M2/M3/etc) macs. Altiverb 8 adds native support for apple silicon. You can check your upgrade options here.
You need to open Pro Tools using Rosetta in order to use Altiverb 7.
To ensure Pro Tools opens using Rosetta:
- open the Finder
- go to the Applications folder
- select the Pro Tools app
- hit get info
- tick the box to Open Using Rosetta.

Solution: Follow this guide to allow Altiverb to access the font again:
https://support.apple.com/en-gb/guide/font-book/fb34862/mac
Altiverb uses the system font Arial. Altiverb does not install this, it should be on your macOS by default. If your system does not have the Arial font or the macOS system prevents Altiverb somehow from using it, Altiverb could look like this:
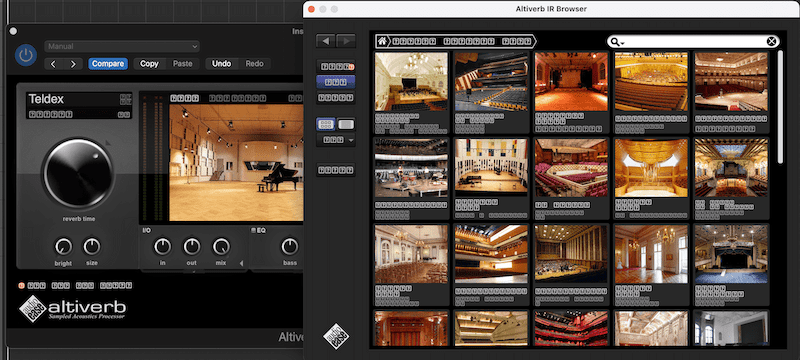
Solution: Restart your mac.
Somehow (we are still trying to find out why) the macOS ignores Altiverb 7 until the computer has been restarted. This is why Logic (or Ableton Live, or any other DAW that uses Audio Unit plug-ins) does not show the Altiverb
There are three differences:
Altiverb 7 Regular supports
- up to stereo input and output
- sampling rates up to 96kHz
- plug-in formats on windows: aax native and vst, on mac: aax native, vst, audio unit, mas and rtas
- up to 5.1 surround in and output
- sampling rates up to 384 kHz
- all plug-ins formats Altiverb 7 Regular supports + TDM on Mac OS X
So, in short, if you do not have sessions on 192k and you work in stereo only, Altiverb 7 Regular will do just fine.
If, at a later stage, you would like to upgrade from Regular to XL this is possible. The upgrade cost is just the price difference so you won't loose any money going for Regular first.
When this happens the Altiverb plug-in fails to copy/move the downloaded IR set to the Audio Ease IRs folder.
It could be Altiverb is not allowed to write in the Audio Ease IRs folder.
Solution: Try locating the folder in the finder (or explorer), hit get info and then verify your user (and the admin group) can read&write in the folder. If you make changes make sure to also apply to all enclosed items too. If this does not help, try using the default location as IRs folder:
/Users/Shared/Altiverb/IRs
You can change the IR folder location in the preferences tab in the Altiverb plug-in:
Any wav audio file can be used as impulse response.
Simply add your file(s) to your User Created IRs folder, the default location is:
/Users/yourusername/Library/Application Support/Altiverb/ *
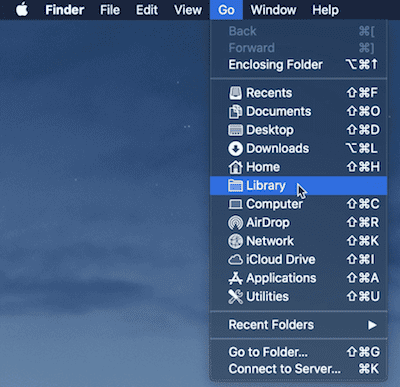
* Please note the MacOS system hides the Library folder in your user folder. You can still open this folder through the GO menu in the Mac finder. Then hold down the option (alt) key and a link to the User Library will magically appear.
Your third party impulse responses folders, libraries can be loaded through:
/Users/Shared/Altiverb/Third Party libraries
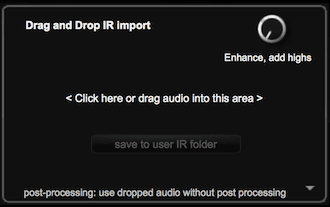
If you have recorded the Altiverb sine sweep to create an IR, then drag your mono or stereo recordings as wave file onto the drag and drop import window in the Altiverb plug-in. You can choose to save your IR into the User Created IRs folder.
- open the add fx window in Reaper on the 6 channel track
- then right click on the Altiverb plug-in and make sure this option is checked:
- ☑️ inform plug-in when track channel count changes
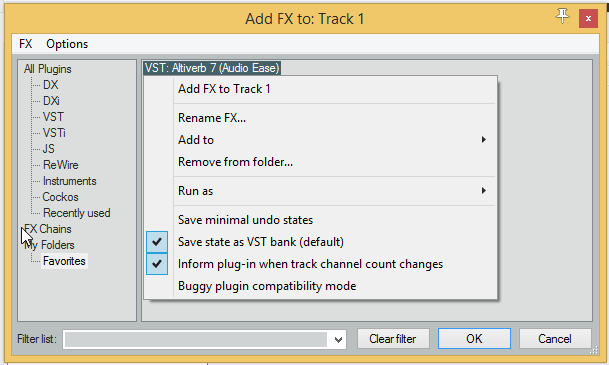
When you then insert Altiverb 7 it should become 6 in 6 out and you will be able to choose the surround IRs in the IR Browser.
To fix this please download the latest first time full Altiverb 7 installer and run this.
Once you installed this you will have all IRs again.
> You can request a link to the latest downloads at:
www.audioease.com/download
This error means the graphics card driver on your system is not up to date. Even when Windows states this is up to date, Altiverb 7 can generate this error and you will find there is a newer driver available (and this will solve this error).
Please try to update your graphics card driver.
Find out what graphics card you have in your system (right click on your desktop, choose change screen resolution, hit advanced settings, that would show you the manufacturer’s name and the model).
Then please go to the manufacturer’s website, hit support/drivers and find the latest driver for your graphics card and download and install this.
Restart your computer.
The problem should be gone now.
This is caused by the fact the Digital Performer (DP) supports three plug-in formats: MAS, AU (audio unit) and VST.
How?
Example: When you save a project with the Altiverb MAS plug-in. And you then change the default plug-in type in DP to AU and re-open this project. DP will load Altiverb, but DP fails to transfer the saved Altiverb MAS plug-in settings to the now Altiverb AU plug-in, and Altiverb then reverts to loading the default settings (which is the Teldex IR).
When this suddenly occurs you are most likely using a different plug-in format then you used before. Try to find out what you used before, force DP to load this Altiverb plug-in from the plug-in settings in the DP preferences and then restart DP and re-open your project. The right settings should load again then.
If you need any help with this let us know. Send us for instance a project file that will not open correctly, then we can quickly help you out.
/Library/ScreenSavers/Screensaver
Best way to understand this is to go back with me to our sampling session when we recorded to room's acoustics for the IR in Altiverb.
mono to stereo
We put a single speaker in the center of the stage and two mics in the audience.
This results in a mono to stereo IR.
When you playback your audio through this IR in Altiverb, it will sound like your audio comes out of that single speaker from the center of the stage (mono!) picked up with two microphones (stereo!).
This IR gives a stereo reverb, however the input is (mixed to) mono, as there is only a single source on stage.
When you want to process a vocal (mono) or direct recorded electrical guitar or something where the panning is not important the mono to stereo IR will do just fine (pro: costs half of the processing then a stereo-to-stereo IR, so it is more efficient in cpu and memory).
stereo to stereo
back to recording the room
this time we put two speakers on stage, one on the left and one on the right side of the stage and we record again with the two mics in the audience.
When you playback your stereo audio through this IR in Altiverb your stereo signal comes out of these two speakers.
Easy to picture here that your original panning will be maintained using a stereo to stereo IR.
So basically it comes down to this:
is your input stereo or is it panned in stereo ?
use a stereo - stereo IR, else you will loose the stereo information in the reverb (although the reverb is stereo).
Sometimes even when using stereo panned sources a mono to stereo IR can be preferred as you do not want the panning to be reflected in the reverb levels. But this is a mixing decision which depends on taste mostly (and music style) and I dare not to advice on that :-)
Then you can then load these IRs again in Altiverb 7.
You can also download the original set from:
http://fokkie.home.xs4all.nl/IR.htm
Snapper
or Snapper crashes upon quitting the application,
or preferences are not recalled properly in Snapper.
Then the macOS might be blocking Snapper in some way.
Please try this:
- first quit Snapper (make sure the app is not open)
- then delete the Snapper preferences file: com.audioease.snapper.plist. This file is the Preferences folder in the User Library. Open the Mac Finder, hit the GO menu, hold down the option (ALT) key and a link to the Library folder will appear. Go to the Preferences folder and delete the file.
- then please restart your mac (important)
- now open the Snapper.app
- open the macOS System Settings
- and review these settings:
- Privacy & Securtiy: Automation
enable Finder and System Events for Snapper:
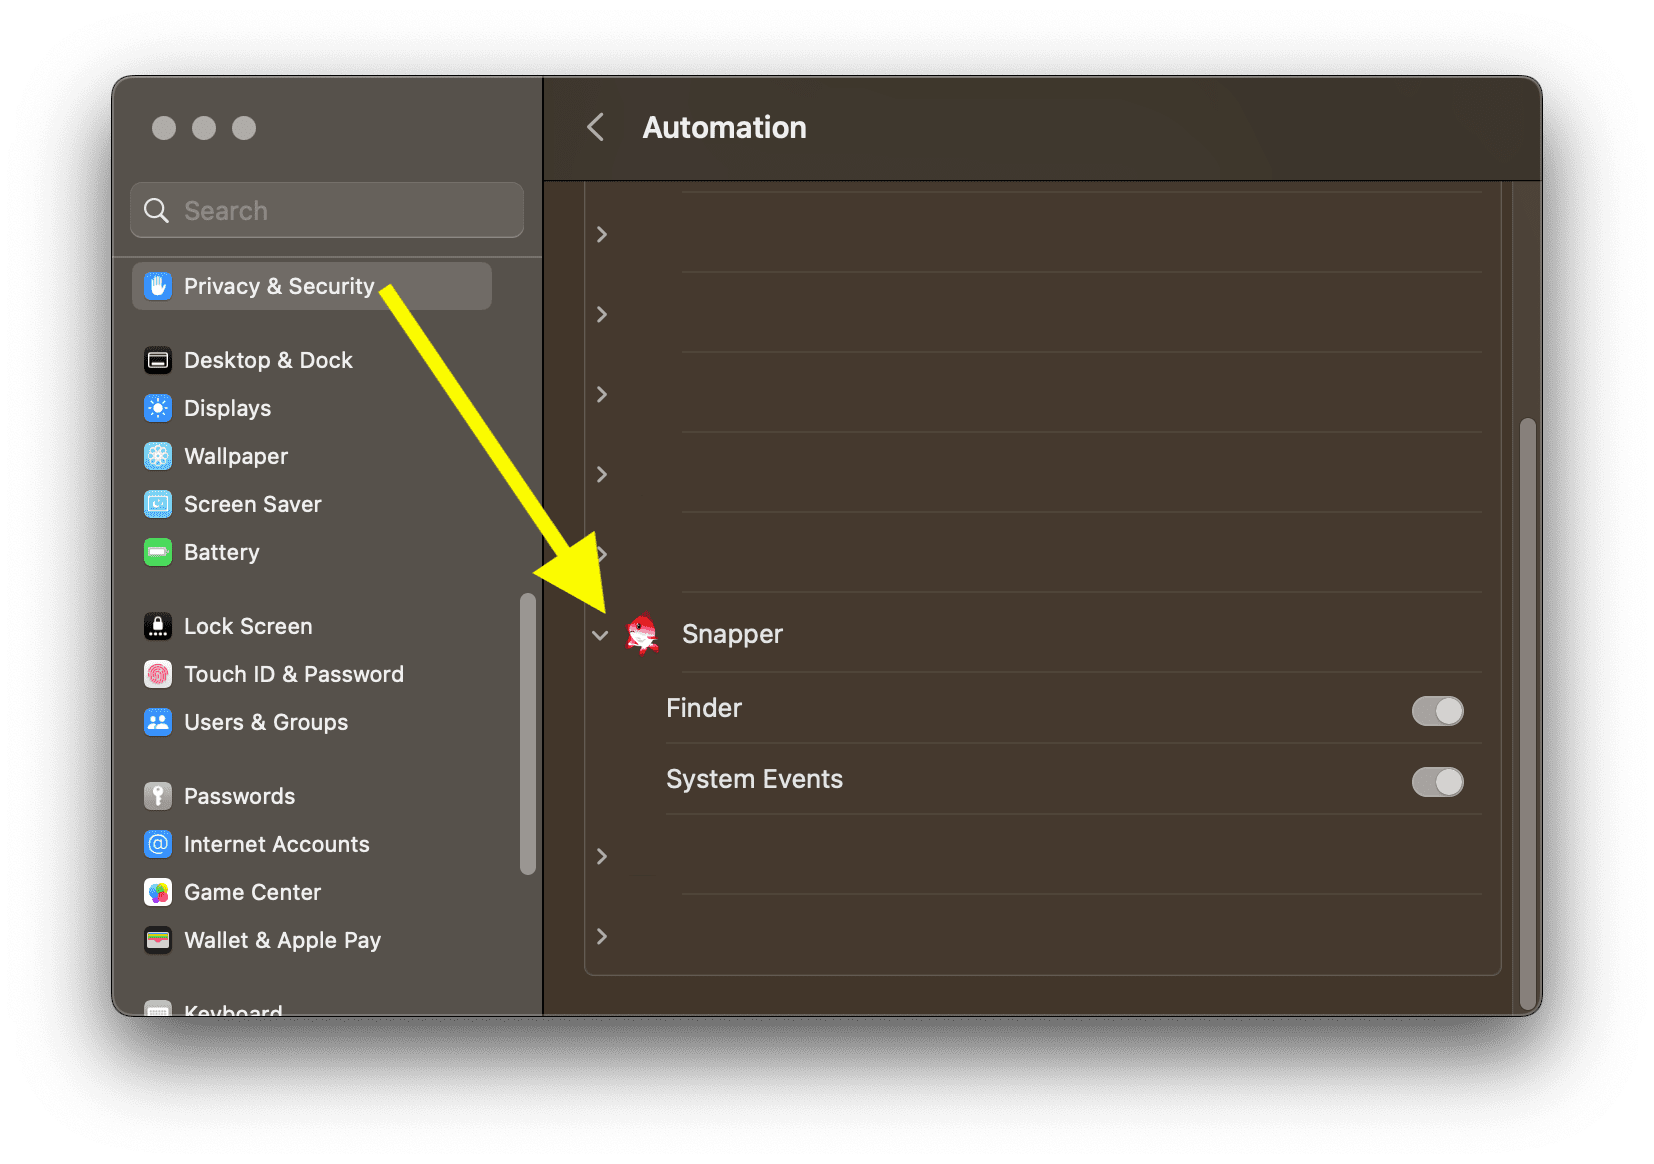
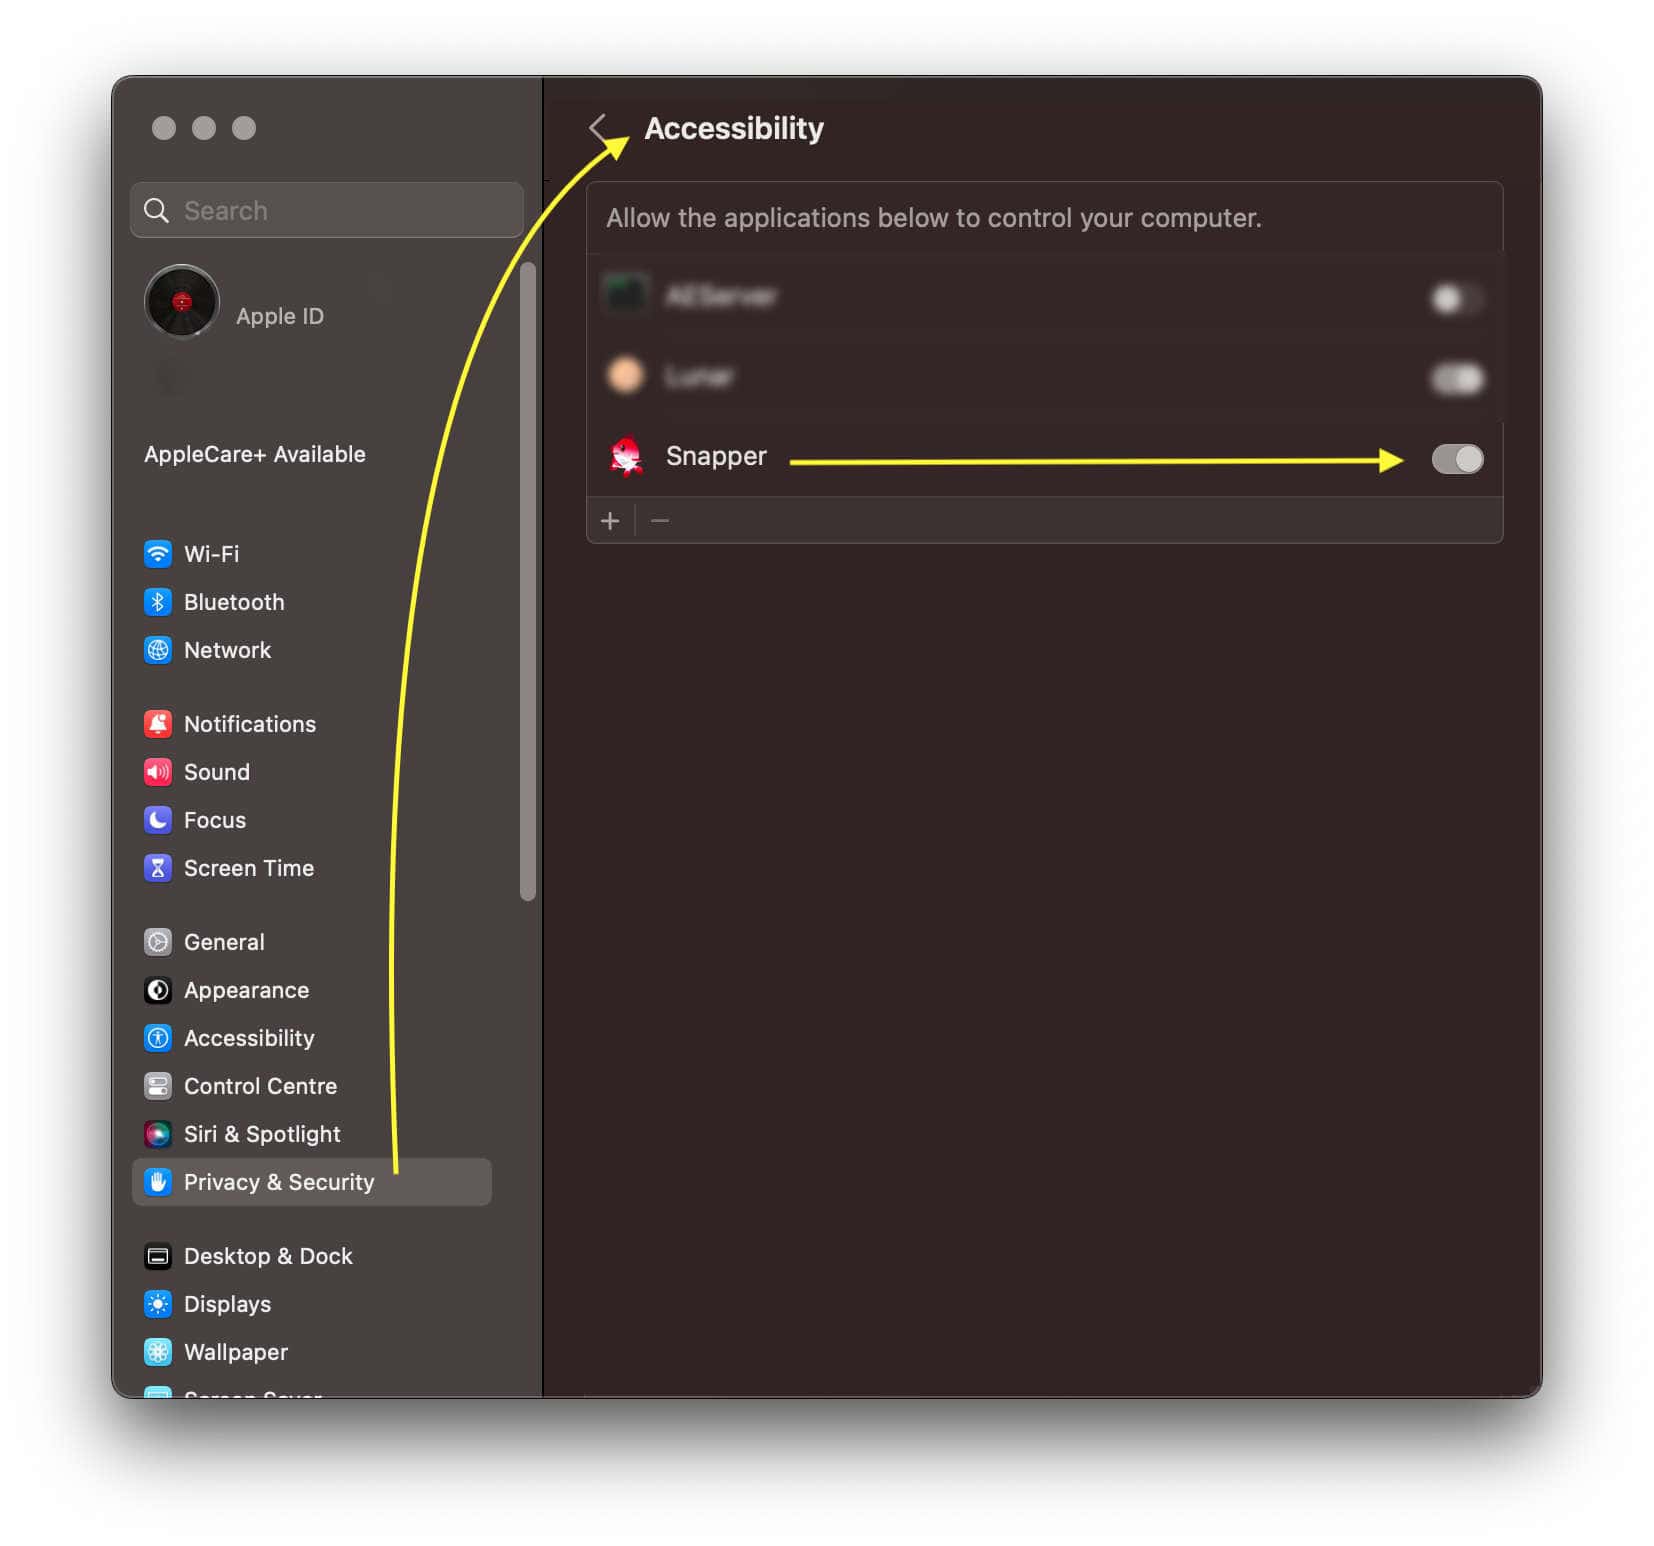
- Privacy & Securtiy: Accessibility
Allow Snapper to control your computer (needed to ask the Finder if an audio file is selected):
- Privacy & Securtiy: Files and Folders
Ensure Snapper is allowed to access your files:
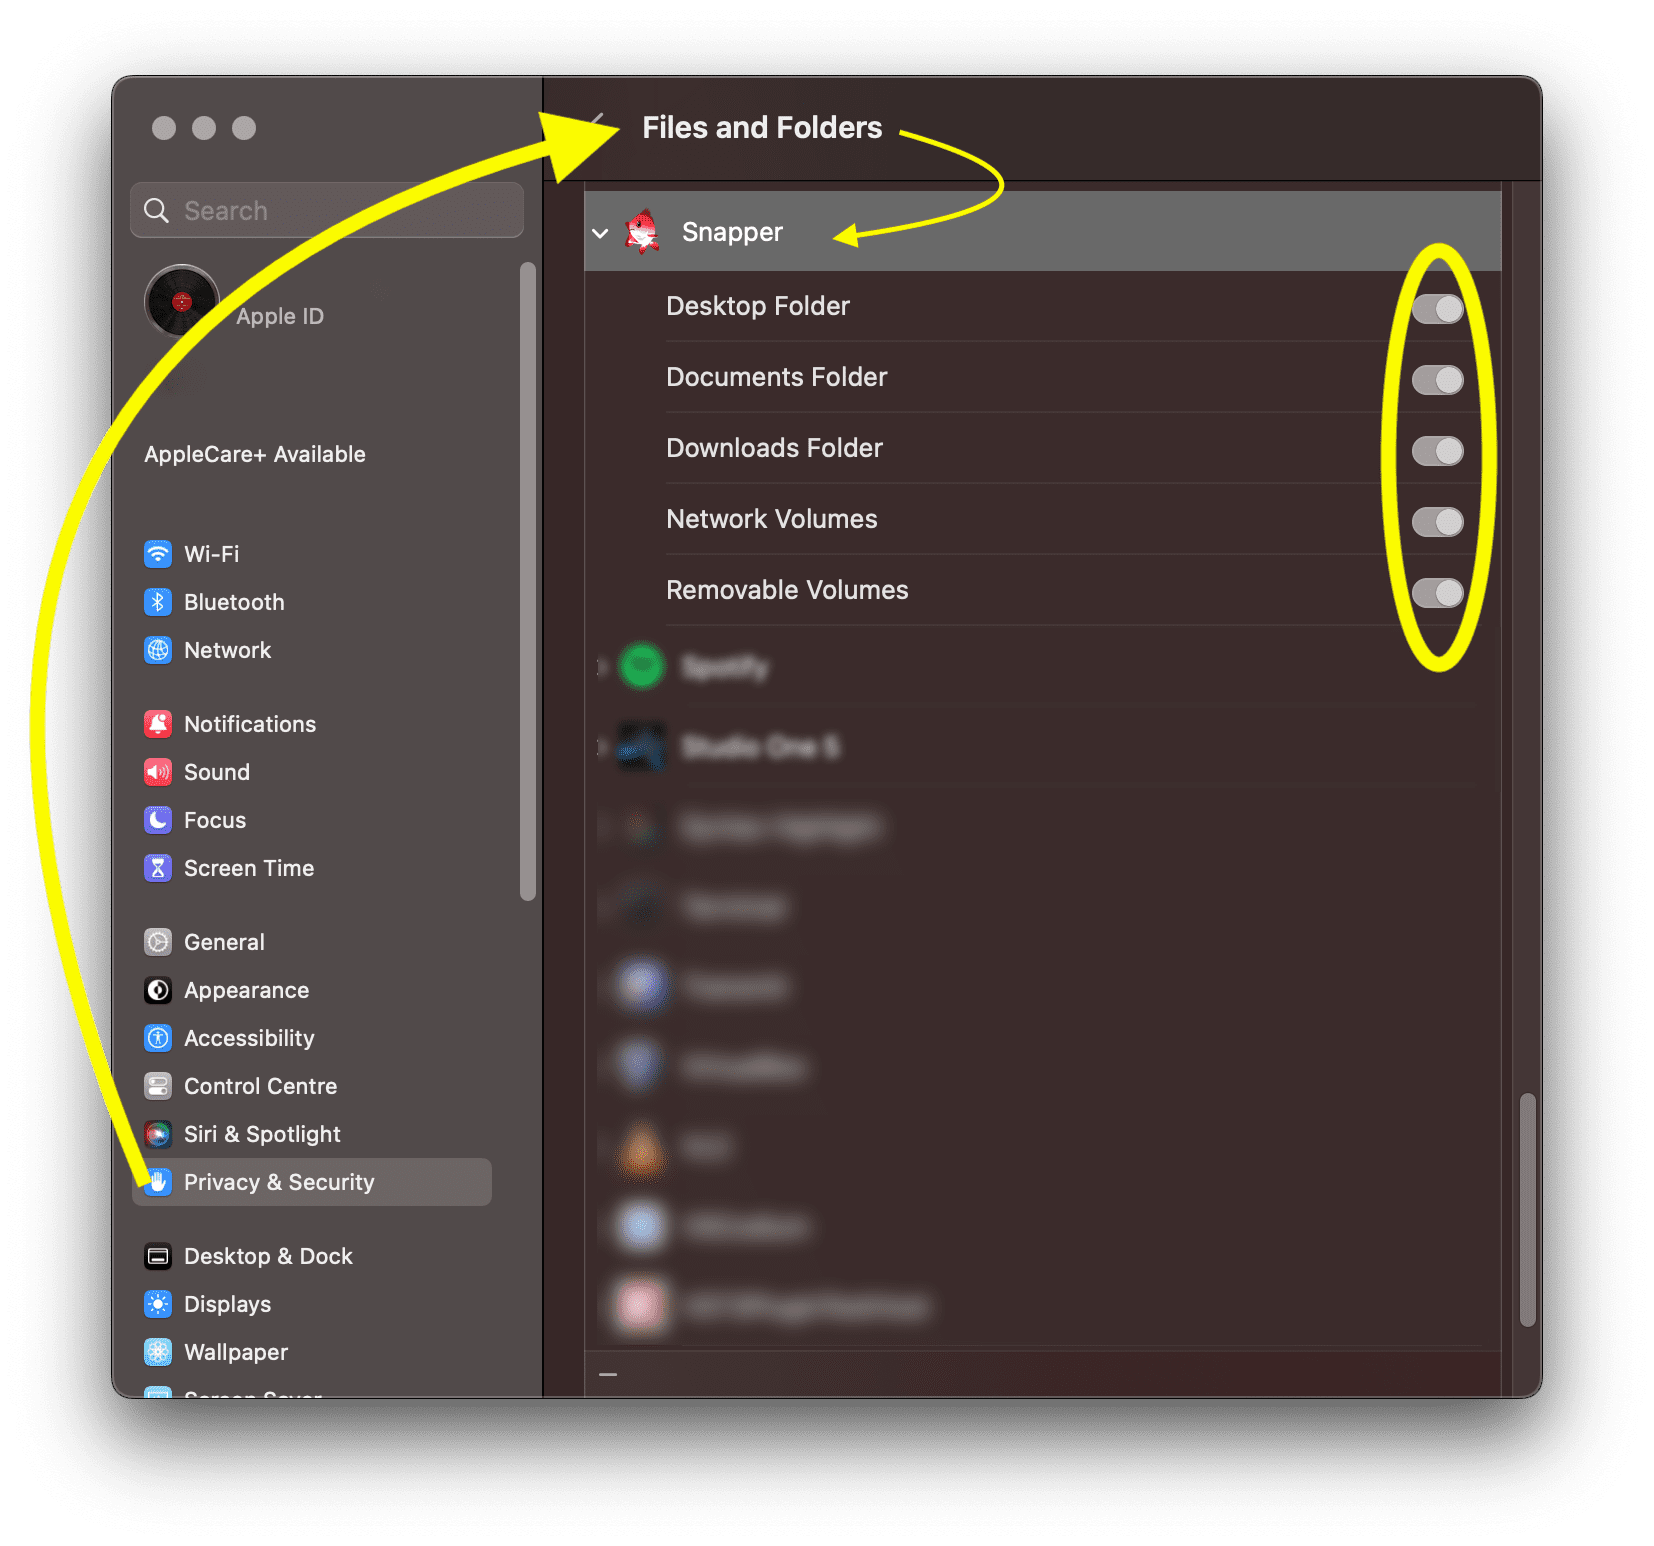
- adapt these when needed and then quit and start Snapper and it should again
This sometimes is a problem, when you want to use the space bar to quickly preview the video in the finder.
There is a simple hack for this:
Use: SHIFT + SPACE BAR to preview the video
This works, even when Snapper is showing you the audio waveform of your selected video in the finder.
Many surround formats like 5.1, 7.1, 7.1.4 (Dolby Atmos) up to 9.1.6 are supported, also for playback.
To ensure Snapper plays back these files as expected, you do need to set up a correct speaker configuration in the Audio Midi Setup from the Utilies folder in your Applications folder.
In Audio Midi Setup, select your audio interface, click on the Configure Speakers button

Select the output format you want to playback and make sure the speakers are correctly configured.
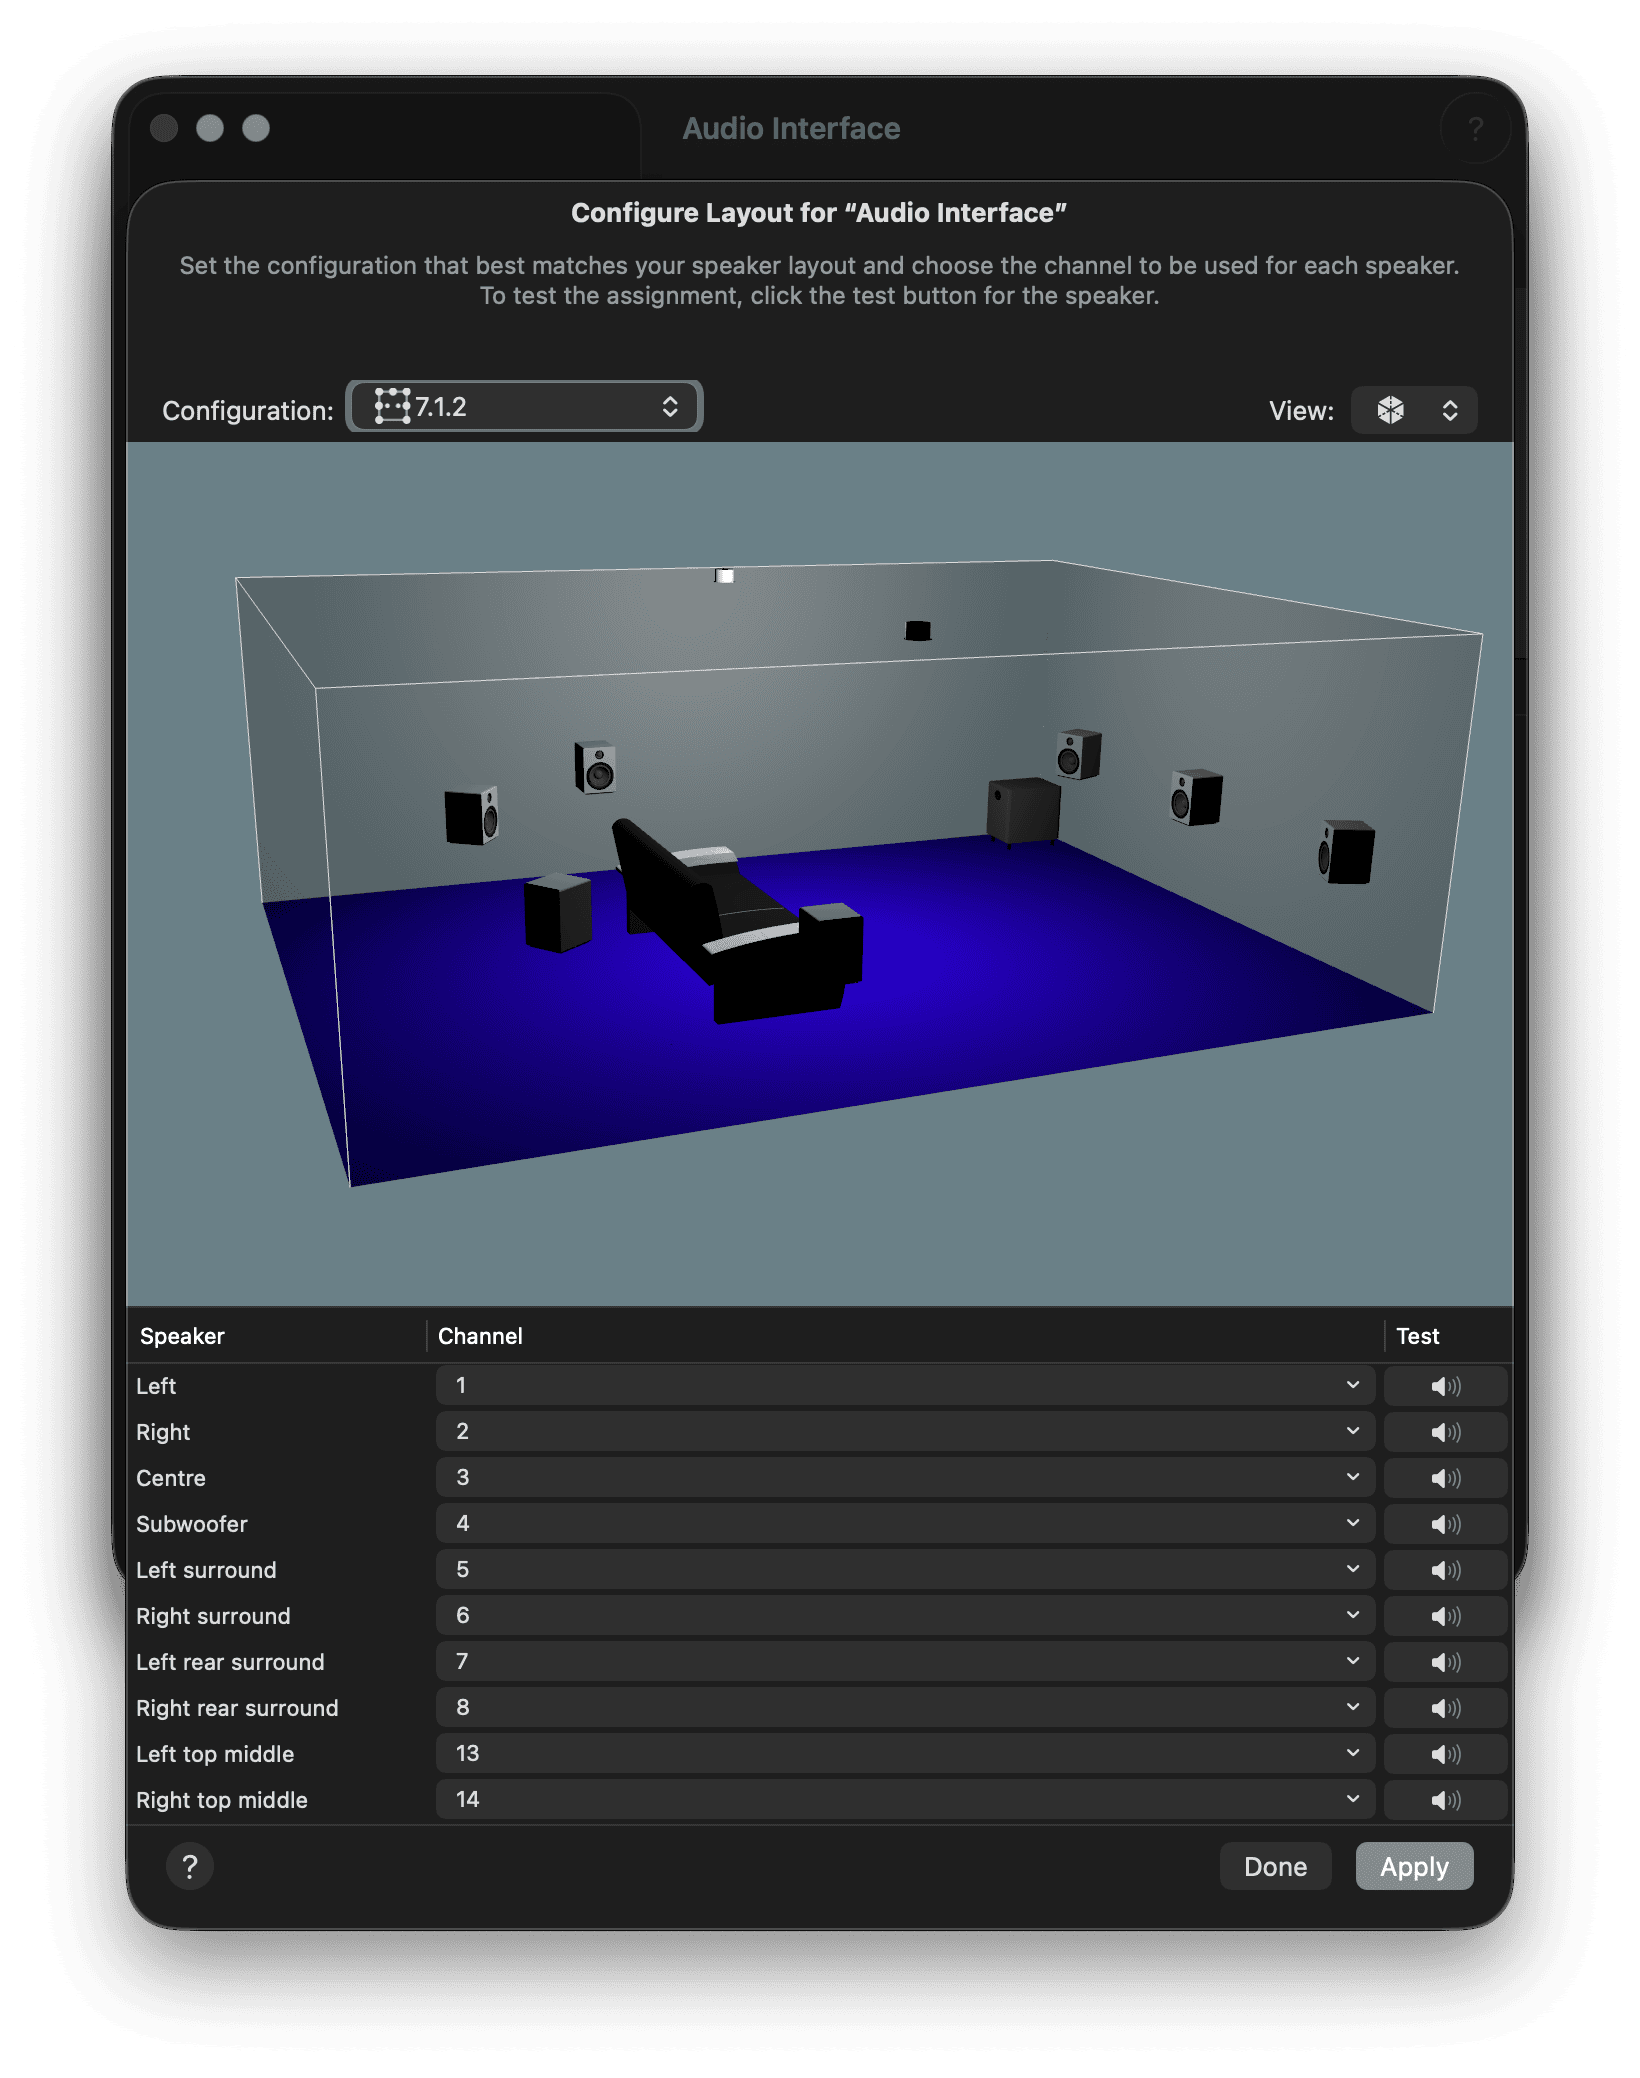
Snapper will playback all channels to the correct speakers for this channel layout.
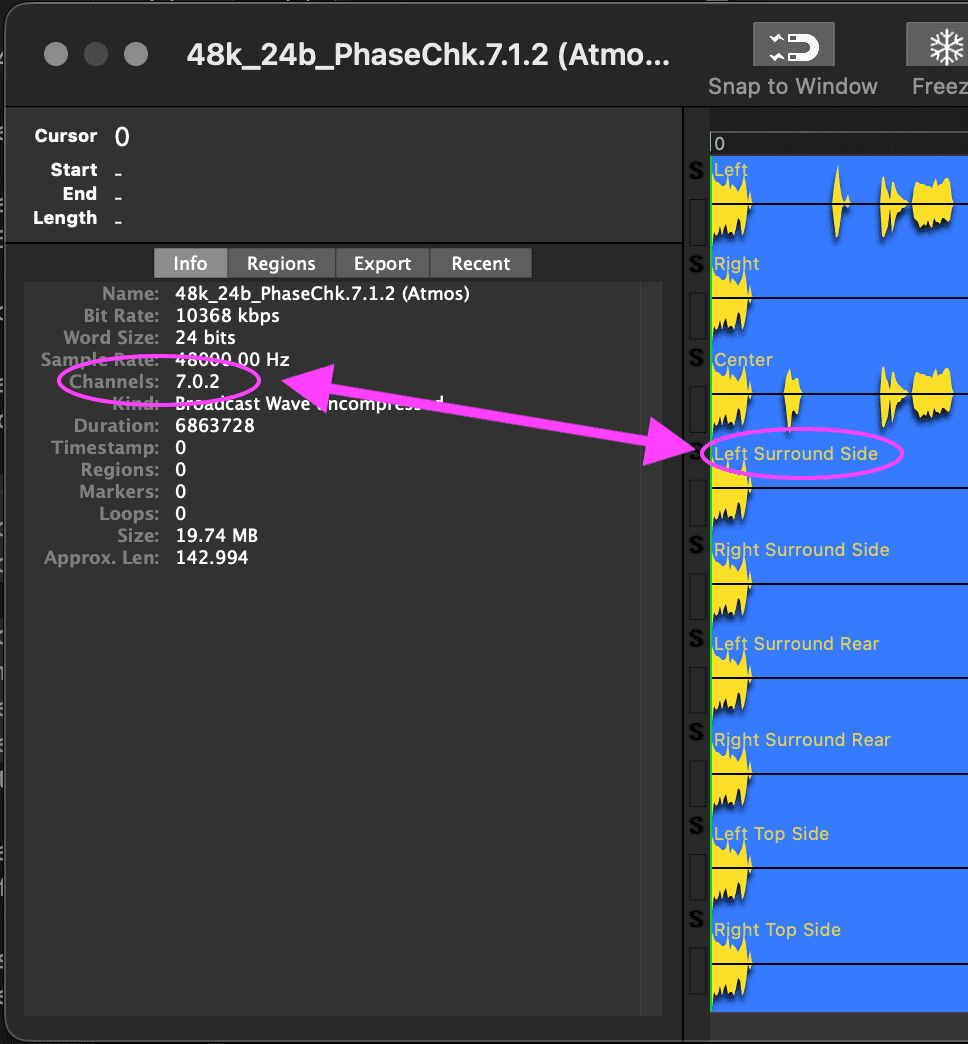
Requirements
Snapper does need to recognize the channel layout and you do have to ensure you have a valid speaker configuration for this channel layout.
Snapper will show the layout in the info panel and the channel name labels will also reveal if Snapper understands the channel order.
When Snapper does not understand the channel order, it will sum all odd and all even tracks to a single stereo signal (to ensure you do hear all audio upon playback).
By default the drag export folder is:
/Users/Shared/Snapper
You can check in the Snapper preferences what you currently use. Open Snapper, go to the preferences, open the export tab, then close to the bottom you should find:

Hit the Folder... button to change the location (we recommend this: /Users/Shared/Snapper)
When this is set, quit Snapper, then start Snapper and then check in the Snapper Preferences if this option is still set correctly.
If not, we have to reset some things, see below.**
If the folder is correctly set, then let's open the /Users/Shared folder in the Finder, select the Snapper folder, hit get info and under sharing & permissions ensure your user and the everyone group are set to Read & Write.
Hit the circle with the three dots and hit 'apply to enclosed items'.
Now dragging audio (selections) out of Snapper should work again.
** If the settings in the Snapper preferences do not stick, something's wrong.
This problem is most likely solved by removing the Snapper cache and preferences.
Open the Mac Finder, hit the GO menu, hold down the option (ALT) key and a link to the Library folder will appear. Open the Caches folder and delete these four folders: com.audioease.snapper
com.audioease.snapper.filestate
com.audioease.snapper.view
com.audioease.snapper.waveform
Go to the Preferences folder and delete this file:
com.audioease.snapper.plist
Then restart the mac (this is important, as the macOS caches the prefs).
https://www.audioease.com/snapper/#support
This can be handy when you lost or misplaced the key code to unlock the Snapper demo to the full version.
Store / purchase / upgrade
https://www.audioease.com/store/#upgrade
The upgrade requires:
- we still sell this software
- your old copy has not been upgraded to the latest before
- you know your registered email address
- If you live outside the European Union (EU) and not in the United Kingdom (UK) then you do not pay sales tax at audioease.com.
- If you purchase as a EU/UK business with a valid sales tax registration number (BTW), (you can provide this on the address page) then you do not pay sales tax.
- If you are from the EU/UK and you do not have a business sales tax number, you pay local sales tax (BTW) on the downloads and Dutch sales tax (BTW, 21%) on the USB keys.
- If you are located in The Netherlands you always pay sales tax.
Connect with us to stay up to date